Aperçu des sections
- Généralités
- How to follow webinars in this course
How to follow webinars in this course
 This course is made up of (not so) many units. Each of these units contains a webinar. Each webinar must be completed to get the final certificate.
To complete a webinar we have to do actions required by the webinar, mainly clicking and typing. You have a couple of attempt for each action. If both goes wrong you fail that action. You can fail up to 20% of all actions in each webinar. It
is quite difficult not to pass a webinar at the first try but, if this happens, you must redo the webinar from the very beginning. Furthermore, actually clicking and typing is neither interesting nor profitable. You are supposed to try
the actions you see in the webinar in a parallel, real, environment on your computer. So, if you cannot understand how to follow a webinar, after following this webinar, you will be able to follow a webinar.
This course is made up of (not so) many units. Each of these units contains a webinar. Each webinar must be completed to get the final certificate.
To complete a webinar we have to do actions required by the webinar, mainly clicking and typing. You have a couple of attempt for each action. If both goes wrong you fail that action. You can fail up to 20% of all actions in each webinar. It
is quite difficult not to pass a webinar at the first try but, if this happens, you must redo the webinar from the very beginning. Furthermore, actually clicking and typing is neither interesting nor profitable. You are supposed to try
the actions you see in the webinar in a parallel, real, environment on your computer. So, if you cannot understand how to follow a webinar, after following this webinar, you will be able to follow a webinar.
- Get some web space
Get some web space
 A web space is made up of some disk space on
a machine connected to the internet plus some programs that runs for you on that machine. Surprisingly, sometime, all this comes for free.... Let's see how to grab some free webspace.
A web space is made up of some disk space on
a machine connected to the internet plus some programs that runs for you on that machine. Surprisingly, sometime, all this comes for free.... Let's see how to grab some free webspace.
- Install Portable Apps onto a USB 3.0 key
Install Portable Apps onto a USB 3.0 key
 In several countries teachers swap classrooms several times during the
day. In each classroom they have to log in into a different computer and find a slightly different environments. Most of them do not control these environments. They do not have admin privileges and therefore they cannot install programs. Their life is not easy!
In several countries teachers swap classrooms several times during the
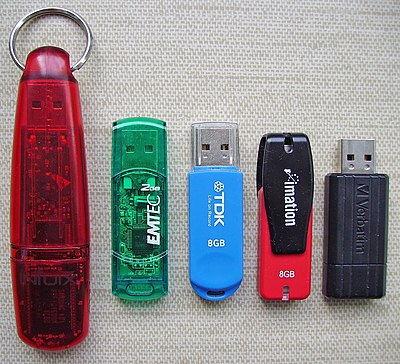
day. In each classroom they have to log in into a different computer and find a slightly different environments. Most of them do not control these environments. They do not have admin privileges and therefore they cannot install programs. Their life is not easy!They try to keep afloat putting some data (e.g. videos) on a usb key or onto a cloud. Very often the network is down or extremely slow so the usb key is, by far, the most reliable solution. In this webinar you will see how to install a shell that provides a wealth of useful free programs that can be installed onto a usb key without admin privileges. This shell is called Portable Apps.
Portable Apps programs do not save information outside the usb key and therefore you can install Mozilla from Portable Apps and save your passwords and personal data when at school or in class. Your sensitive data will remain on the usb key. This solution will enable us to show, later in this course, how to save all your materials onto the cloud and make them available, selectively, to students.
The downside of t
 his approach
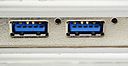
is that programs runs from the usb key. Usb memories are slower than hard disks but, nowadays, the difference in speed is not so disturbing if you use a usb 3.0 pen plugged into a usb 3.0 port.. So take care to find a usb 3.0 pen. Usb 3.0 plugs are
usually blue.
his approach
is that programs runs from the usb key. Usb memories are slower than hard disks but, nowadays, the difference in speed is not so disturbing if you use a usb 3.0 pen plugged into a usb 3.0 port.. So take care to find a usb 3.0 pen. Usb 3.0 plugs are
usually blue.
- Install Moodle on a free hosting service
Install Moodle on a free hosting service
 Moodle is de facto standard in open source systems for E-learning, It shares a 25% market! The competitor ahead of Moodle
in market share is Blackboard with 28% share. Moodle is free and open source while Blackboard is neither free nor open-source. Blackboard costs something like $1,200/student/year.
The costs to pay for Moodle lies only in costs for hosting and in the costs for training teachers and system managers.
Moodle is de facto standard in open source systems for E-learning, It shares a 25% market! The competitor ahead of Moodle
in market share is Blackboard with 28% share. Moodle is free and open source while Blackboard is neither free nor open-source. Blackboard costs something like $1,200/student/year.
The costs to pay for Moodle lies only in costs for hosting and in the costs for training teachers and system managers.In this section we will show how to host Moodle on a free webspace provider. Then we will use this Moodle implementation to host materials for your course. In a later webinar we will use this framework to host lecture notes from your IWB. Obviously there are a lot of other options that Moodle gives you. Even for a basic usage you have to learn how to create a course how to create users and how to enroll users to your courses. These are standard procedures that can be easily learnt from Moodle documentation elsewhere.
The procedures in this webinar covers most basic issues for having a TOTALLY FREE running copy of a Moodle implementation. Using this teachers are allowed to have their own private copy of a Moodle implementation to hand out materials to students.
The solution represented here suggest that a teacher can develop its own Moodle site. Nevertheless, a Moodle course can easily be ported to another Moodle instance. So, separate courses from separate Moodle instances, can be exported to a school-wide Moodle, if any.
IThe same procedure given here can be used to set up a school-wide or class-wide Moodle instance. Therefore the contents in this section are interesting for both teachers, class coordinators and system managers. Nevertheless having a personal Moodle can save a lot of work to temporary teachers or when when moving across different organizations.
Support for Mobiles
The Moodle site has a particular support for mobiles. To let the user enjoy the Moodle app you have to setSite administration>Mobile app>Mobile settings>Enable web services for mobile devices i.e. enablemobilewebservice. This in turn requires that Display debug messages (debugdisplay) should be disabled and Mobile notifications should be enabled in Manage message outputs.
HTTPS
Moodle works better on https but sometimes the installation do not work on https and run into "TOO MANY REDIRECTS" to prevent this you can:
be happy with http and put
$CFG->wwwroot = 'http://somesite/moodle';
or put
$CFG->wwwroot = 'https://somesite/moodle';
$CFG->sslproxy = 1;
After this considr also changing all content URL from http to https as explained in:
You will need to change all embeded content from being requested over http. Links do not matter. But you will need to update images and iframes, scorm modules, and LTI external tools. You can modify external tools to open in a new window instead of in an iframe and they will work fine.
A new tool was added to Moodle 3.4 to aid in this process. This is available via a link in Site administration > Security > HTTP security > HTTPS conversion tool. See MDL-46269 for details.
Upgrade or move your Moodle installation
There is no simple procedure for this. However the basic steps are:
- go to the plugin page listing all the installed plugins and make an hardcopy of the present plugin situation;
- put the sit in maintenance mode;
- copy the moodledata folder into its new location (possibly leaving where it is now);
- go in phphMyAdmin and dump all the tables that are used by Moodle and restore them in the new place (possibly leaving where they are now). Edit the dump to suit your needs (e.g. change the ;
- save the current php code for your Moodle installation (or at least config,php) download the new version and copy it where the old one was or in the similar position on the new server, then put the old config.php in place;
- edit config.php an make the necessary changes;
- go to the plugi page you have saved in step 1 and copy all the code for the components (plugin, blocks, themes...) you have added to your Moodle. The are scattered across the Moodle filesystem in various places. The name on the left column (e.g. mod_somename)
will tell you where the code must go. You will notice that the folder is present in the old install and it is absent in the new.
- point your browser to localhost/moodle and wait. An administration page shows telling you that you are at the point of no return. Boldly go beyond!
- Moodle check your environment and makes some requests, if they cannot be satisfied because you are on a shared server stop and bail out, you cannot support Moodle on that site
- The system do alot of upgrades, click on continue several times. When everything seems ok still run cron i.e. https://some.domain/moodle/admin/cron.php?password=somepassword
- Rename all the entry in the database with http://OurMoodle.com/admin/replace.php OR http://OurMoodle.org/admin/tool/replace/index.php and rename the domain OldMoodle to OurMoodle.
Backup and Questions, Questions Category and Sharing
If you would like to have questions banks shared across you school you have to modify the Teacher capabilities to enable teachers to put questions in shared categories. The process is described here.
On the other hand if you want to include a quiz in a course backup the Moodle backup procedure yanks and backup all the shared category even if the quiz just use questions in a sub category. As a result backups are huge and often do not restore running into PHP timeouts. Furthermore, upon course restore all shared categories are pushed to a non shared category with an error message. To have compact backups the hint is not to use shared categories to share questions. If you do so you will not redistribute your quiz with your course. You still have the option to redistribute your question hierarchy as a XML dump.
The Calendar, repeated events
The calendar interface brings you an interface where BY DEFAULT an edit propagates to ALL weekly repeated events in the future and also in the past. If you forget to unmark this all the chained events are affected, The Moodle developers have been asked to change this but they didn't. The solution is to edit all the occurrence of :setDefault('repeateditall', 1)tosetDefault('repeateditall', 0). This is necessary in a couple of files in Moodle 3.7 and in Moodle 4.0 in\htdocs\moodle\calendar\classes\local\event\forms\update.phpand in\htdocs\moodle\calendar\event_form.php. YMMV. Another problem is deletion of events. A good idea is to delete repeated events by delete one and all the following. To det this behaviour of delete you can patch the original code in\htdocs\moodle\calendar\lib.phpin the code for the functiondeleteby turning$event = new calendar_event($event); $event->delete(false);intoif($event->timestart > $this->properties->timestart){ $event = new calendar_event($event); $event->delete(false) }The Generico plugin
The Generico set of plugins could be used to insert verbatim code in HTML Moodle pages like these. To install this you have to install the generico filter and the generico button for the Atto editor. Then, when editing text material in Moodle using Atto you can insert directives to the Generico filter.Clean a Moodle re-install
There are several post showing that the Moodle database and the /moodledata/filedir area are always growing and there are no utilities to trim the file area or certain tables of the database. This plugin can delete the backup files you left behind. This post gives some idea about clearing some tables. You can delete safely all below moodledata/temp/backup and there are big files that remains whenever you try to delete something big and fail for timeout. In my installation the tables mdl_files and mdl_question_answers are too big i.e. 300K and 200K lines. This document could be of some interest to fix this.
- Install Nextcloud onto a free hosting service
Install Nextcloud onto a free hosting service
 Cloud services offer a way to have ubiquitous
access to your data from every computer connected to the internet. This, in turn, allows apps to have a consistent transparent behaviour across all devices owned by a user. To obtain such a transparency people relies on hosted commercial
cloud architectures they do not control. As a result users data are available for the cloud provider for profiling and data mining. Furthermore, the choice of a particular cloud provider, suggests the adoption of a set of apps, thus constraining
the user to be bound to a proprietary approach.
Cloud services offer a way to have ubiquitous
access to your data from every computer connected to the internet. This, in turn, allows apps to have a consistent transparent behaviour across all devices owned by a user. To obtain such a transparency people relies on hosted commercial
cloud architectures they do not control. As a result users data are available for the cloud provider for profiling and data mining. Furthermore, the choice of a particular cloud provider, suggests the adoption of a set of apps, thus constraining
the user to be bound to a proprietary approach. However, a few free open source solutions exist. They can be installed onto a free web space, thus making users free to choose the most appropriate apps for each task. In fact, usually, open source cloud systems are designed to integrate with other open source apps.
Unfortunately, most of the people are not able to set up their own self-hosted cloud space. In this webinar we will try to help people to learn how to do this. With this goal in mind we choose Nextcloud as the cornerstone for a self-hosted cloud system. Nextcloud is the most adopted open source solution for a self-hosted cloud (see here comments).
Therefore in the following webinar you will learn how to set up a cloud system on top of your free web space. This will provide you with a truly private cloud space for teaching materials.
The reader interested in adding Nextcloud plugins migh find himelf blocked by server policy. In this case manual plugin installation can be done with the following steps:
- downlolad the plugin in the foo.tar.gz format then upload and unpack it in nextcloud/apps/ so that the nextcloud/apps/foo folder appears.
- log in as admin, click on the top right avatar and select apps then click on the top right Disabled Apps
- find the foo app and enable it (wait enabling for a while sometimes)
- Moodle and Nextcloud
Moodle and Nextcloud
 At this point we have a Moodle installation and a Nextcloud installation
in sync with some folder on our usb pen. The next step is to see how to connect files in Nextcloud as Moodle resources.
At this point we have a Moodle installation and a Nextcloud installation
in sync with some folder on our usb pen. The next step is to see how to connect files in Nextcloud as Moodle resources. Moodle resources are organized into courses and are accessed by students. Moodle can enforce flexible policies to guide this access. The teacher devise this policy. She/He decides who must see what and when. In general copyrighted materials can go securely behind a Moodle login and will never be indexed by search engines.
However, when coming to the problem of doing small updates to teacher materials, teachers would prefer to simply edit the files on the usb pen. We can support this and let the Nextcloud structure to take care to update cloud files that are linked to Moodle resources.
In the end what is done during the lesson could be online at the end of the lesson within a clearly organized Moodle course with, nearly, no teacher intervention. So the goal of this section is to enable the introduction of a new organization that supports old procedures with no overhead.
- OpenBoard with Moodle onto Nextcloud
OpenBoard with Moodle onto Nextcloud
 Next we consider the framework we created putting together Moodle and Nextcloud. Upon this framework we build a procedure to support the usual teaching activity. We simply switch form the usual chalk and blackboard lessons to
taking notes with the Interactive White Board (IWB). One might want to step into class, do some teaching on the IWB and have the lessons available online for students. In this webinar we show how to do this with no overhead. To get this working we show how to install OpenBoard and how to save screenshots from the IWB onto Nextcloud. Then students, accessing Moodle through the Internet will be able to consult and
annotate IWB screenshots during homework.
Next we consider the framework we created putting together Moodle and Nextcloud. Upon this framework we build a procedure to support the usual teaching activity. We simply switch form the usual chalk and blackboard lessons to
taking notes with the Interactive White Board (IWB). One might want to step into class, do some teaching on the IWB and have the lessons available online for students. In this webinar we show how to do this with no overhead. To get this working we show how to install OpenBoard and how to save screenshots from the IWB onto Nextcloud. Then students, accessing Moodle through the Internet will be able to consult and
annotate IWB screenshots during homework.
How to make OpenBoard portable
This webinar is based on a portable version of OpenBoard that is outdated. Unfortunately the portable version of OpenBoard is some releases behind the OpenBoard latest development. Furthermore OpenBoard installation requires Administrator privileges. You can try to obtain, all on your own, a portable version of the latest OpenBoard relase (for Windows 10), that will be running without Administration privileges, with the following steps:
- log into a Windows 10 PC as Administrator:
- find a USB key with as virtual drive Z: and with PortableApps on it:
- create Z:\PortableApps\SOMEFOLDER.
- download and install Sandboxie PLUS and create a sandbox (e.g. mysands)
- download and install OpenBoard distro and run it within mysands;
- during the installation say that you want to install Openboard onto Z:\PortableApps\SOMEFOLDER. At the end of the installation process start OpenBoard;
- go to Sandboxie PLUS and inspect what the installation copied to mysand;
- in particular copy Z:\PortableApps\SOMEFOLDER from mysand to real Z:\PortableApps\SOMEFOLDER on the USB key.
- copy other files you find in mysands onto the USB pen folder were OpenBoard.exe is (e.g. msvcr120.dll)
- close all the programs eject the USB key:
- go to another Windows 10 installation as a regular user and start the OpenBoard.
- see if it works...
How to use OpenBoard portable
Once you have your portable copy of OpenBoard (OB) installed on a USB key you have to modify the file
OpenBoard.config(usually inZ:\PortableApps\OpenBoard.1.6.3\etc) adding the lineDataDirectory=Z:/PortableApps/OpenBoard.1.6.3/BoardFilesin the section[App].With this you will bring your whiteboards lessons with you in your USB pen. Every time you grow these lessons the changes are reflected in this internal space on the USB pen. These files are in the internal format and not suitable for sharing with others. To share them you have to Document>Export the whiteboard in .ubz format so that others can Document>Import it. Noe that if not exported to .ubz the mods are not available to others. So to propagate these lessons these .ubz must be placed in a folder mirrored by some cloud.
- Nextcloud External Storages and Moodle Course Files (Optional)
Nextcloud External Storages and Moodle Course Files (Optional)
 Sometimes a teacher needs to link a reference to dynamic contents (e.g. a HTML5 homemade web site) whose development copy is kept on the usb key.In other webinars we learn how to deploy course material to students. We assume that, as usual, this material is well organized and stored in our usb pen. Students must log into Moodle. Moodle in turn will access folders from a cloud we have established using Nextcloud. The cloud mirrors part of our usb key. This scheme works if you expect your students to download documents.Indeed there are several options to hand out documents for download. On the other hand, to provide access to more dynamic documents, with transparent connection to a local usb copy, can give some problems. We show how to solve them in this webinar.In this webinar we illustrate an approach that uses a feature in Nextcloud (the External Storage App) to mirror files on our usb. This App is used to control exactly the area where, on the server cloud, Nextcloud stores these files.Then we map this area to a Course Folder. A Course Folder is a particular folder area on the server associated with Moodle courses. This is managed by an optional Moodle plugin called Course Files repository.So In this webinar we first install this Course File repository plugin in Moodle and then install Nextcloud External Storage App. In the rest of the webinar we see how to configure the two to get the desired effect. Some basic testing closes this webinar.The whole thing is worth doing because this is the most flexible and effortless approach to develop DIY HTML5 ancillary sites on your usb key. They will be mirrored quickly to the cloud and will be accessible through Moodle. An example for this is shown at the end of the webinar.Following this webinar you will see things build up into site megais1024kilo but you are supposed, in parallel, to enrich your own Moodle site and have things running there.The subject of this webinar is useful if and only if you plan to distribute through Moodle, homemade web pages. This might not be the first step in a basic teacher to student communication and therefore this webinar is optional.YOU CAN SKIP THIS IF NOT INTERESTED. THIS WEBINAR IS NOT MANDATORY TO GET YOUR CERTIFICATE.
- Moodle File System Repository and Nextcloud (Optional)
Moodle File System Repository and Nextcloud (Optional)
 In this webinar we learn how to hand out course materials
to our students. We assume that, as usual, this material is well organized and stored in our usb pen. Students must log into Moodle. Moodle in turn will access folders from a cloud we have established using Nextcloud. The cloud
mirrors part of our usb key. This scheme works if you expect your students to download documents. In this webinar we illustrate an approach that uses a feature in Nextcloud (the External Storage App) to mirror files on our usb. This App is used to control exactly the area where, on the server cloud, Nextcloud stores these files.We map this area to a Moodle File System Repository. A File System Repository is a particular area on the server associated with Moodle repository. This is managed by an optional Moodle plugin called File System.So In this webinar we first enable this File System repository in Moodle and then install Nextcloud External Storage App. In the rest of the webinar we see how to configure the two to get the desired effect. Some basic testing closes this webinar.The whole thing is worth doing because this is the most flexible and effortless approach to hand out course material that are on your usb key. You will find then in the Moodle File Picker. They will be mirrored quickly to the cloud and will be accessible through Moodle. An example for this is shown at the end of the webinar.Following this webinar you will see things build up into site megais1024kilo but you are supposed, in parallel, to enrich your own Moodle site and have things running there.The subject of this webinar is useful if and only if you plan to distribute documents through Moodle and want to select them using the File Picker, This might not be the first step in a basic teacher to student communication and therefore this webinar is optional.YOU CAN SKIP THIS IF NOT INTERESTED. THIS WEBINAR IS NOT MANDATORY TO GET YOUR CERTIFICATE.
In this webinar we learn how to hand out course materials
to our students. We assume that, as usual, this material is well organized and stored in our usb pen. Students must log into Moodle. Moodle in turn will access folders from a cloud we have established using Nextcloud. The cloud
mirrors part of our usb key. This scheme works if you expect your students to download documents. In this webinar we illustrate an approach that uses a feature in Nextcloud (the External Storage App) to mirror files on our usb. This App is used to control exactly the area where, on the server cloud, Nextcloud stores these files.We map this area to a Moodle File System Repository. A File System Repository is a particular area on the server associated with Moodle repository. This is managed by an optional Moodle plugin called File System.So In this webinar we first enable this File System repository in Moodle and then install Nextcloud External Storage App. In the rest of the webinar we see how to configure the two to get the desired effect. Some basic testing closes this webinar.The whole thing is worth doing because this is the most flexible and effortless approach to hand out course material that are on your usb key. You will find then in the Moodle File Picker. They will be mirrored quickly to the cloud and will be accessible through Moodle. An example for this is shown at the end of the webinar.Following this webinar you will see things build up into site megais1024kilo but you are supposed, in parallel, to enrich your own Moodle site and have things running there.The subject of this webinar is useful if and only if you plan to distribute documents through Moodle and want to select them using the File Picker, This might not be the first step in a basic teacher to student communication and therefore this webinar is optional.YOU CAN SKIP THIS IF NOT INTERESTED. THIS WEBINAR IS NOT MANDATORY TO GET YOUR CERTIFICATE.
- Nextcloud upgrade on a shared free server (Optional)
Nextcloud upgrade on a shared free server (Optional)
 In this webinar we learn how to upgrade your Nextcloud installation on a free shared server. Nextcloud upgrade is a lengthy and space consuming operation. It has to be like that to be safe. As a consequence, on shared free servers, usually with tight resources, this operation tend to fail. In this webinar we relaxed two constraints, first we assume we can tolerate some risk about data loss. Indeed , if data are lost on the cloud, we can always put them on a mirror and have them reloaded to the cloud. We just have to make a backup of one of the local mirrors. Second we assume that the user is able to perform some basic file management operations on the shared server. To satisfy this constraint the student is advised to complete this webinar before going for this one. With these two assumption taken as granted we simply skip some steps of the predefined procedure and upgrade our Nextcloud server quickly and in place (i.e. with little space overhead).
YOU CAN SKIP THIS IF NOT INTERESTED. THIS WEBINAR IS NOT MANDATORY TO GET YOUR CERTIFICATE.
- Conclusions
Conclusions
 By the end of this course you must have a USB key with PortableApps installed on it. Then there must a web space lended by Altervista at some blahblah.altervista.org. Installed onto this web space there must be a Moodle server at blahblah.altervista.org/moodle and a Nextcloud server at blahblah.altervista.org/nextcloud.
Using such a structure you must be able to pick a pen at some IWB, draw your lecture notes, and have them delivered to students logging into Moodle. This transfer must be hassle free for the teacher.
Obviously there is more than that both in Moodle and Nextcloud. However we were focused in supporting the usual teaching style reaching high availability added by clouds and e-learning tools.